SELECTION PROCESS | HSG CAREER DAYS 2024
Step 1 – log in on my.hsgcareer.ch
a) Click “Login” on the start page
b) Enter your username and password


Step 2 – go to the selection page
a) Click on «Career Events» and choose «Manage my events»
b) Click on «Manage participants» on your event
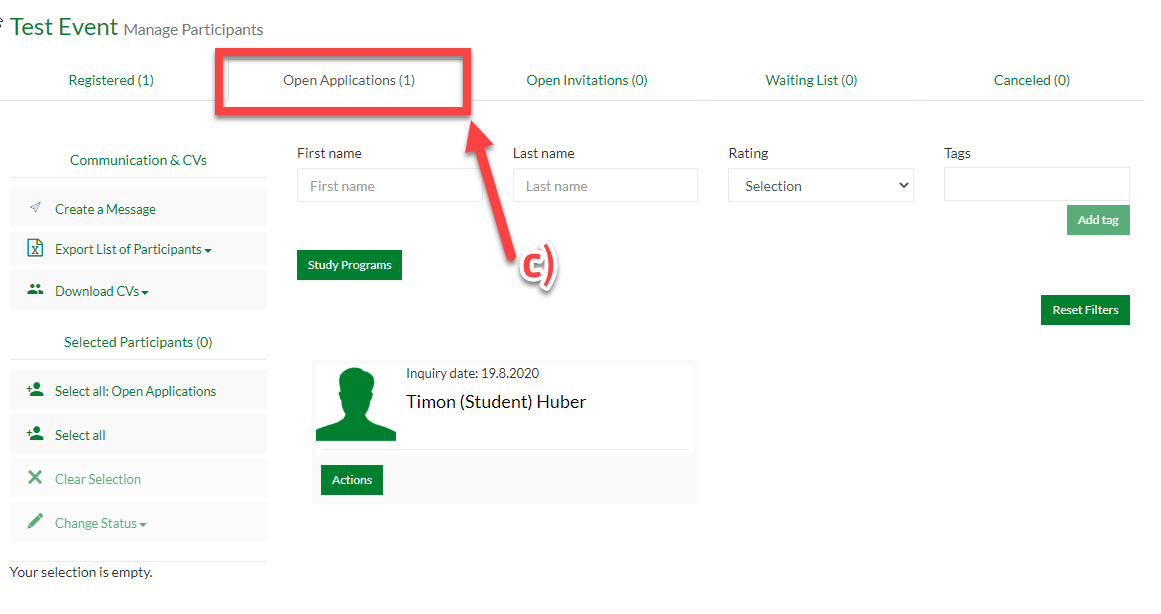
c) Open applications
Under «Open Applications» you see all students who have applied to your event(s). The number indicates how many applications you have received.


c) Open applications
Under «Open Applications» you see all students who have applied to your event. The number in brackets shows you how many applications there are.

Step 3 – screen the CVs
a) To access a CV of a student, click «Actions» just below the profile picture of the candidate.

b) You then have the option to see the detailed profile -> Click: «Show Profile»

With just one click you can download all the CVs. How? Click “Download CVs – requests from participants”. Please note that a download of 50 CVs takes +/- 15 minutes. The download runs in the background and you will receive an email as soon as it is completed. You have a choice of various options to export the CVs. Please pick your preferred option (selected participants, registered, request by participant or waiting list).


Rating, Comments and Tags
You can group the students with a star (1 to 3) and write comments and tags. All of those options create a structure and help you finding the right students. None of the comments, ratings and tags will be visible for the students.
You can afterwards apply a filter related to your rating.


Step 4 – accept & decline students for your event
a) Select specific students
b) Change status to one of the following options:
c) “Accept/register” You accept the student to your event!
“Reject request” This candidate doesn’t match your profile and you decline the application.
“Add to waiting list” You are not sure yet if you would like to invite the candidate and will make a decision later.
 d) Click on "Send Message"
Note: Every time you change a status, an automatic e-mail is sent out to all selected students.

Before you send a message you'll see a preview of the e-mail that will be sent to the participants.

Please make sure you invite / decline all students or add them to the waiting list. In the end, there should be no open applications left.
Step 5 – send messages to students
Send messages to students for all the events.
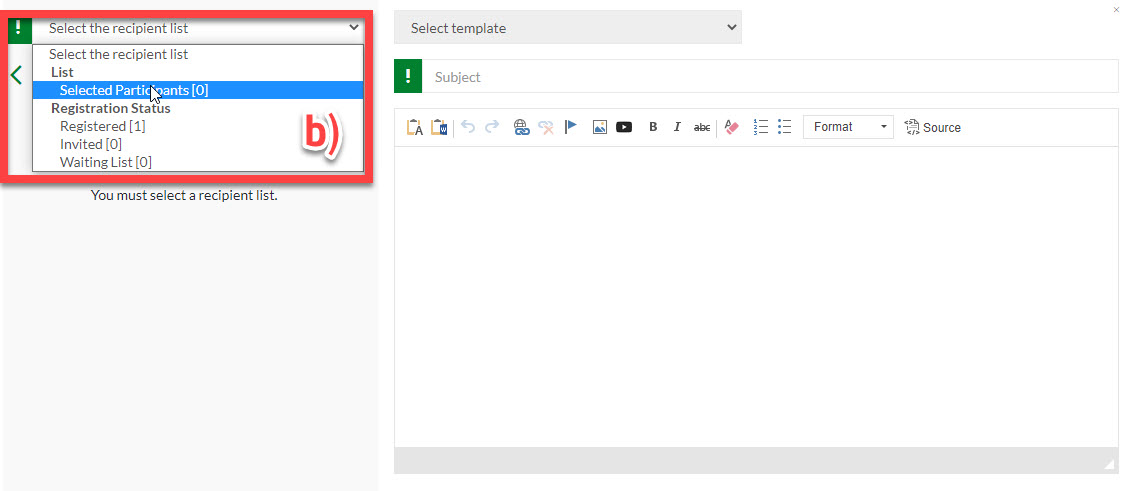
a) "Create a Message"
b) Choose the option “Select the recipient list” and click “registered”. Now “send message”. All the registered students will receive this message.


Send messages to students for an interview
a) Click “Export List of Participants”
b) Pick the email addresses from the Excel file
c) Send a personal email to the selected student (including start time and room number)


Step 6 – download CVs
You have a choice of various options to export the CVs. Please pick your preferred option (selected participants, registered, request by participant or waiting list).

 Deutsch